Friday, January 31, 2014

Neutral and Expecting


I finally wanted to share a little bit of news with everyone: I'm pregnant!  We are 25 weeks along and due in mid May with our first.  These photos were taken when I was about 22 weeks.  My bump is much bigger now!  The last few months have been an absolute whirlwind.  I spent the entire first trimester lying on the couch/bed with an overwhelming sense of fatigue.   The nausea was unbearable and relentless.  I would be on a 28 hour overnight call and only manage to keep down a dinner roll and some ginger ale.  Thank goodness for the endless supply of Saltines at the hospital.

On top of the first trimester blues, we moved from our apartment to a new condo.  I hate moving!  I repeat, I hate moving!  Add the nausea and generally icky feeling makes moving even more arduous.  Thankfully Dr. S was super duper patient, kind, and understanding.  Miraculously when I hit week 15, that dreaded feeling of blech just lifted.  It was so nice to finally feel normal again, and we feel incredibly blessed for our little bun in the oven!

In the upcoming few months, I'm hoping to share some fun ways to dress with an ever expanding belly.  My goals are to: 1. Stay comfy.  2.  Try to extend my old wardrobe as much as possible.  3.  Find some maternity clothes that don't make me feel dumpy.  Stay tuned!


Cashmere dress: Rhys Dwfen (similar here).  Gray cardigan: J.Crew.  Scarf: Anthropologie Grignolino scarf.  Heather gray tights: Hue.  Handbag: Botkier.  Gray booties: Belle by Sigerson Morrison 'Felicia Dip Wedge Booties' (similar here).

Tuesday, January 28, 2014

Baby Bunting


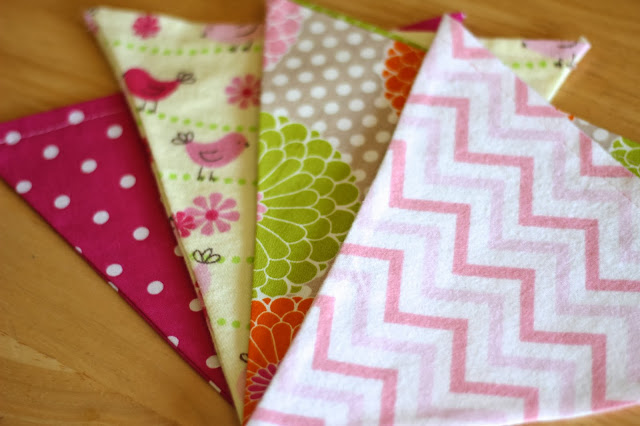
This past weekend, I left sunny warm California and braved the cold New Jersey winter to visit my best friend and celebrate the impending arrival of her baby girl.  Since I was bringing all of the decorations with me, I needed something that would survive being crammed into my carry-on bag.  And to make it worthy of a cross country trip, I wanted something that would last beyond the shower and possibly be used as nursery decoration.  My best friend loves birds so the bird fabric was a no-brainer.  She also told me she was incorporating yellows and greens into the nursery, so I picked fabrics that I thought she would like and would complement the decor.

I followed the tutorial here with a few modifications.  I originally wanted to do this "no sew" with Stitch Witchery but it was actually more of a hassle getting all of the seams to line up.  I caved and borrowed my friend's sewing machine.  To give the bunting flags a little more structure, I used fusible interfacing.  I had wanted to use the zig-zag trim (pictured below) to attach the triangles, but it ended up looking sloppy and unfinished.  So to create a cleaner edge, I switched back to the extra wide double fold bias tape.


Friday, January 17, 2014

DIY Glitter Jewelry Dish


I have been searching for a jewelry dish for my nightstand for years.  Without one, my jewelry sat in a tangled mess and many stray earrings fell to the floor and panicked searches would ensue.  Sure, there are plenty of really cute options out there.  However this need would only come to me when I saw the mess before and after bed, and I always forgot about it when I was out shopping.  So when my friend Wendy wanted to do a DIY project with me and suggested this glitter plate, I couldn't say yes fast enough!

We found the plates for 99 cents each at the local Goodwill.  We couldn't find the triple thick glaze, so we used glossy Mod Podge instead.  The key is to allow everything to dry completely before applying more layers of glue and glitter to ensure good coverage.  Otherwise, you'll just be pushing clumpy glitter around.  The Mod Podge goes on white but dries clear.  The more coats you do, the smoother the finish.  We quit after 2 layers of glitter and 3 coats of Mod Podge.  Patience is not one of my virtues.


Tuesday, January 14, 2014

Cozy and Oversized


Sometimes you want to just throw on a big sweater coat.  Sure, the weather here in LA may be nothing near the frigid temps affecting the rest of the country.  But I'll be the first to admit it: since moving back from the Northeast, I've become weak sauce.  Or maybe I was always weak sauce?  It's painful to think about the times when temps would dip well below 0 degrees with the windchill.  I would not only be wearing 5 layers up top, but long underwear, earmuffs, a hat, and a scarf that not only covered my neck but most of my face.  Those were the days when the tiniest bit of exposed skin was just unbearable.  This sweater coat may not have been the ideal piece of outerwear when I was living in Boston and Philly, but the half sleeves are perfectly acceptable in LA.


Sweater coat: Vince, old but similar here.  Silk shirt: Vince, old but similar here.  Black pants: Ann Taylor Loft.  Handbag: Chanel Medium Flap Bag in Black Caviar.  Shearling lined boots: All Saints 'Hyde Boots'. 

Thursday, January 9, 2014

Borrowed from the Boys


Life has been busy lately (more info to come!), which means that blogging has sadly gone to the wayside.  These were taken back in November(!) when I met up with a friend for lunch.  For some of my good friends, the setting may look familiar as it's Pasadena City Hall, where Dr. S and I got married 3 1/2 years ago.  I always love coming back to this place, as it's usually quite peaceful and stirs up fond memories of one of the best days of my life.

For this outfit, I went with a slightly tomboy-ish look with a sweater/collared shirt, relaxed skinnies, and laceless oxfords.  I added my beat-up shoulder bag, which has been my trusty sidekick for over seven years, when I purchased it from the mens' department of the Neiman Marcus outlet during med school.  Seven years later, I still love it! 


Sweater: Random brand from Loehmann's.  Silk shirt: Equipment in Inca Gold.  Jeans: Dylan George 'Lucy Low Rise Skinny Jean' (seen here and here).   Laceless oxford shoes: Joie 'Louie Louie'.  Necklace: J.Crew.  Leather messenger bag: Stephane Verdino.

Tuesday, January 7, 2014

Jeweled Sweatshirt


These photos were taken a few weeks back when Mr. J and I were down in LA for a Life By Appointment reunion.  Usually with couple friends, the wives are friends and the husbands just tag along, or vice versa.  Fortunately, Dr. S and Mr. J don't just get along but they are also good friends.  So when the four of us get together, it's always a great time.

I hope everyone is having a great start to 2014!  For me, it has already been crazy busy.  I worked through Christmas and New Years and just finished playing host and tour guide to my baby brother during his week long visit.  With all that's been going on, I haven't had a chance to sit down and reflect on 2013 and set goals for 2014.  So I'm looking forward to hitting the pause button this weekend!


Jeweled Sweatshirt: J. Crew. Leather mini-skirt: ASOS (old). Purse: Chanel. 
Bracelet: J. Crew (old).  Heels: Zara (old) (similar here).

Wednesday, January 1, 2014

A Pear-y Sweet Post


Happy New Year everyone!  2013 was a great year for Life By Appointment and we're looking forward to all of the new adventures and experiences 2014 will bring.  With our work schedules, neither of us were able to ring in the new year with much pizazz.  Instead, Sarah had a quiet evening with family and was in bed early to prepare for work the next day and Mr. J and I worked late and then enjoyed a simple dinner at home.  Our celebration wasn't glamorous but in hindsight, I think it may have been my favorite New Year's Eve ever!

Over the holidays, we were generously gifted a big basket of perfectly ripe pears.  The problem with perfectly ripe pears is that unless you have an army to eat them right away, they quickly become over-ripe pears.  Despite Mr. J and my best efforts, we just couldn't consume the pears quickly enough to keep up with their ripening process.  So what to do with a nearly full basket of very ripe pears?  Bake with them of course!

I baked two treats - pear cupcakes with a honey buttercream for a work potluck and an Italian pear cake to enjoy at home.  For the cupcakes, I cut down the sugar, since the pears added some sweetness and I wanted the pear flavor to stand out a bit more.  I also drizzled in a couple tablespoons of the honey instead of using the full half cup.  I think using full portions of the sugar and honey would be fine but I personally prefer my desserts a little less sweet.  The batter for the Italian pear cake was so light and fluffy.  The pear chunks plopped right in and the batter billowed around them like a soft pillow.  The result was a light airy cake with moist pear chunks, even despite my over-baking.  I'll definitely be making this again and when I do, I'll have to remember to take out the cake a few minutes earlier.


Pear Cupcakes with Honey Buttercream
(adapted from here and here)

Pear Cupcakes
Ingredients
2 1/4 cups all-purpose flour
1 tsp baking soda
1 tsp baking powder
2 tsp ground cinnamon
1/2 tsp ground ginger
1 tsp salt
1/2 cup unsalted butter, softened
1 1/2 cup sugar
2 large eggs
1 tsp vanilla extract
3 cups finely diced pears (from 2 large ripe pears)

Honey Buttercream
Ingredients
4 large egg whites
1 cup sugar
pinch of salt
1 1/2 cup (3 sticks) unsalted butter, at room temperature
2 tsp vanilla extract
2 tbsp honey

Directions
Preheat oven to 350 degrees F.  Line muffin tins with paper liners and set aside.  Sift flour, baking soda, baking powder, spices and salt in a medium bowl.

Beat butter and sugar on medium-high speed until pale and fluffy.  Mix in eggs and vanilla. On low speed, mix in the finely diced pears.  Add the flour mixture until just combined.  Do not over mix.

Fill the lined cups about 2/3 full and bake until the tops are golden and a toothpick comes out clean, about 20 minutes.  Let the cupcakes to cool completely on a wire rack before frosting.

For the honey buttercream, combine the egg whites, sugar, and salt in a heatproof bowl set over a pot of simmering water.  Make sure the bottom of the bowl is not immersed in the water but just hovering above it.  Whisk frequently under the sugar is dissolved and the mixture reaches 160 degrees F.  Remove from heat and beat on medium-high speed until stiff peaks form and the mixture has cooled to room temperature.  Reduce the speed to medium and add the butter in small additions, waiting for it to incorporate each time before adding more.  Stir in the vanilla extract and drizzle in honey until just incorporated.  Transfer to pastry bag and pipe swirls on cooled cupcakes.


Italian Pear Cake
(original recipe here)

Ingredients
2 very ripe pears, peeled and cut into large chunks
1 1/4 cup all-purpose flour, sifted
1/4 cup corn starch
3/4 cup sugar
1 tbsp baking powder
pinch of salt
1/3 cup + 1 tbsp butter, softened
3 eggs
Confectioners' sugar

Directions
Preheat oven to 350 degrees F.  Cream the eggs and sugar until light and fluffy.  Sift the flour, corn starch, salt, and baking powder together.  Add in the flour mixture and mix until just combined.  Add in the butter until the batter is smooth.  Pour batter into a lightly greased 9 inch Springform pan.  Gently push in pear chunks into the batter.  Bake for 25 minutes until toothpick comes out clean (no more than 30 minutes).  Allow to cool then sprinkle with confectioners' sugar.  

Enjoy with a cup of coffee.  Try to limit yourself to just one slice at a time.

Blogging tips