Sunday, March 31, 2013

Shades of Pink


Most days, I like to keep it casual and comfortable, which means soft cotton and silk tops paired with jeans and flats.  This dusty pink silk campshirt from Ann Taylor has been a real workhorse in my closet.  I bought it on mega sale last year and I regret not buying it in more colors.  I have a ton of silk blouses from Equipment but none of them fit as well as this one (note to self, must take those blouses to the tailor asap).

I am a total girly girl and pink is my favorite color.  STUN is offering two pairs of their prime wayfarers for only $35 (this deal is still available with code STUN2) so I just couldn't resist snagging a pair of these hot pink sunglasses.


Blouse: Ann Taylor (old) (This season's option here. Also love this option here). Striped shirt: Zara. Jeans: Dylan George 'Lucy'. Shoes: Madewell. Earrings: Tory Burch. Bracelet: J. Crew. Sunglasses: STUNglasses.

Thursday, March 28, 2013

Ombre Almond Cupcakes


Happy Easter, Passover, and Cesar Chavez Day!  We decided that we loved the sparkly ombre trend so much that we wanted to carry it over to our baking.  Thus these ombre sanding sugar topped almond cupcakes were born!

We saw these cupcake liners in the sales bin at Michael's and just knew that we had to get them for a spring baking project.  Though we traditionally prefer Linzer-style cakes when it comes to almond cakes, this recipe yielded the lightest and most moist cupcakes ever.   And the Italian meringue buttercream is our "go-to" buttercream recipe.  We're already thinking that both these recipes can serve as great bases for other combinations -- hazelnut cupcakes with chocolate buttercream anyone?


Ombre Almond Cupcakes

DIY Colored Sanding Sugar

Ingredients:
1/2 cup clear/white sanding sugar
Food coloring gel of your choice (we used AmeriColor's soft gel paste food coloring)

Directions:
Place sanding sugar in a Ziploc bag.  Place a small drop of the food coloring gel into the bag (small drop!  A little goes a long way).  Seal bag and shake/knead mixture until uniform in color.  Be sure to break up any clumps.  Pour out mixture into a plate or bowl and allow to air dry.  Transfer back and store in a sealed bag or container.

Almond Cupcakes 
(adapted from this recipe)

Ingredients:
1 cup butter, softened
2 cups white sugar
4 eggs
1 1/2 tsp almond extract
1 2/3 tsp vanilla extract
2 1/2 cups all-purpose flour
2 tsp baking powder
1/2 tsp salt
1/2 cup ground almonds (we ground our own almonds in a food processor)
1 cup milk

Directions:
Preheat oven to 350 degrees F.  Line cupcake pan with liners.

Sift together flour, baking powder, salt, and ground almonds.  In the bowl of your stand mixer, cream butter and sugar with the paddle attachment until light and fluffy.  Beat in eggs one at a time and then add the vanilla and almond extracts.   Alternating between the flour and the milk, beat until just incorporated, scraping the sides as necessary.  Fill cupcake pan 2/3 full and bake for ~20 minutes (this will vary with your oven) until a toothpick comes out clean.

Transfer to a cooling rack and allow to cool to room temperature before frosting.

Italian Buttercream
(We halved the recipe and substitute almond extract for vanilla extract.  Full recipe here)

Ingredients:
1 cup granulated white sugar
1/4 cup water
4 large egg whites
2 cups unsalted butter, cubed, at room temperature
1 tsp almond extract

Directions:
Combine 3/4 cups of the sugar with the water in a small saucepan and bring to a boil over medium-high heat.  Stir to dissolve the sugar then allow to cook without stirring until the mixture reaches 240 degrees F.

Place the egg whites in the bowl of your stand mixer fitted with the wire whisk attachment.  When the sugar has reached approximated 230 degrees F, whip the egg whites on medium speed to soft peak consistency.  Add the remaining 1/4 cup of sugar and beat until the egg whites hold to medium peaks.

When the sugar syrup reaches 240 degrees, stream the hot syrup into the egg whites with the mixer running on medium speed, allowing it to run down the side of the bowl.  Increase the speed to high and continue to whip until the meringue has cooled to room temperature and the bowl is no longer warm to the touch.

Add the cubed butter gradually, mixing after each addition until fully incorporated.  Blend in the almond extract and store in an air-tight container.  May be refrigerated for up to 1 week.

Assembling the Cupcakes

Top the cupcakes with the buttercream (we piped them with a pastry bag fitted with a round tip and then smoothed the top with a pastry spatula).  Dip or sprinkle with the colored sanding sugar.  If you want to achieve an "ombre" effect, dip each half into the colored sanding sugar.  Place the cupcakes on a large baking sheet lined with wax paper.  Sprinkle the middle with your third colored sanding sugar.  The wax paper on the bottom will catch any excess sanding sugar and should have all three colors.  Sprinkle this mixture to finish the "ombre" effect.


Tuesday, March 26, 2013

Blush from Head to Toe


I feel blessed to finally be back in Southern California after spending 11 years on the East Coast.  Around March, I remember always being jealous of my friends in warmer climates, prancing around in their open-toed shoes while I sloshed around in gray icy slushThere's something about spring that just makes me excited to bare my arms and wear sandals.  

While monochromatic outfits have been popular lately, wearing pink from head to toe can easily go from chic to childishAvoiding bubble gum pink hues and sticking to more subtle shades of blush keep you from looking like a walking cotton candy ball. 


Blush eyelet silk shirt: Cynthia Steffe.  Leopard print skinny jeans: Current/Elliott 'The Stiletto'.  
Trench coat: Zara (old) (similar here).  Purse: J.crew Edie in Burnished Rose.  
Ankle strap heels: Zara.  Bracelets: Anthropologie, Vita Fede, Madewell.


Sunday, March 24, 2013

Navy Lace with Red


I posted a sneak peek of this outfit on Instagram a couple weeks back.  We had some friends visiting from out of town and took the opportunity to get dressed up for a night out in Beverly Hills.

I've loved DVF's dresses since I was in college but my student budget always precluded me from owning one.  These days, I still try to maintain a reasonable budget but will treat myself every once in a while.  I may be kidding myself but I think this dress is timeless and love the simple silhouette paired with the eyelash lace.


Navy lace dress: Zarita by DVF.  Shoes: Christian Louboutin New Simple Pumps in Nude Patent (similar here and here).  Red ostrich wallet on chain (worn as a clutch): Rebecca Minkoff (similar here).  Bracelet: J. Crew.  Lipstick: Nars Velvet Matte Lip Pencil in Dragon Girl.

Thursday, March 21, 2013

DIY: Frame Your 'Stache


We found these frames at the Fairfax Flea Market a few weeks back and while they were nothing special at first, we saw potential for a fun DIY project.  We were drawn to the circular shape and the carved details.

When shopping for vintage frames (especially those that aren't rectangular), it's helpful if they come with the glass since custom-shaped glass can be hard to find and very costly.  We got the frames at a bargain and after buying all of the other materials, the entire project cost us only $17 a piece.  


The ugly paint job and faded flower pictures had to go.


Remove the glass and spray-paint the frames.  We used a matte white spray paint.


Use the glass as a template to trace and cut your paper.  We found the mustache printed paper at Paper Source.  We were originally looking for a graphic print like a chevron or brocade but when we saw the mustache paper, we just had to get it!  

You can also use wrapping paper or wallpaper or even fabric.  We also used a foamcore poster board to provide extra thickness behind the mustache paper.


Screw in 1/8" offset clips to secure the glass, paper, and foamcore in place.


The finished product hanging in Sarah's bathroom.


The finished product in Carolyn's living room.

In other news, we are super sad that Google Reader will be going away this summer...so we've signed up for Bloglovin'! Please follow us here --> Follow my blog with Bloglovin!

Tuesday, March 19, 2013

Gold Lucite Heels


I bought these heels a few weeks back at the Decades Bi-Annual Shoe Sale.   The super shiny crackle gold finish screamed out at me.  Then add a lucite heel?  Sold!  It looks like Decades is having another shoe sale on Wednesday, this time online.  Too bad I'll be on overnight call in the hospital, otherwise I'd have my credit card ready.

I used to be deathly afraid of wearing lip color before, but I've come around to realizing it can be a quick way to transform an outfit.  I first heard about the new Giorgio Armani Lip Maestros on one of my favorite beauty blogs, Into the Gloss, and they are truly amazing.  They are velvety soft, super vibrant in color, and pretty long-lasting.  Plus they don't leave your lips super dry like a lot of other lip products.  One application lasted a whole night of dinner and drinks at Bazaar (which was delicious, by the way). 


White silk blouse: Vince (similar here).  Sequined 'Migration Mini Skirt': Leifnotes from Anthropologie.   Gold pumps with lucite heels: Dries Van Noten.   
Lions head earrings: Vintage.  Quartz point cuff: Madewell.  
Lip color: Giorgio Armani Lip Maestro 402

Sunday, March 17, 2013

Spring Flowers and Mint


One of my oldest friends, the lovely Sandy from Sandyalamode, was in town last weekend and we spent the day drooling over all of the designer goods at South Coast Plaza.  Our moms became friends when they were pregnant with us so I've known Sandy for my entire life and she's been like a little sister to me.  Since embarking on this blogging journey however, the roles have reversed -- she has been a great mentor and a blogging "big sis."

While summer and winter are often one and the same in LA, this winter has been colder and rainier than usual.  I decided to welcome spring with these floral skinny jeans and a new bag.  I like to buy a fun, (more) "affordable" bag for the Spring/Summer season and this mint satchel is my new baby for Spring/Summer 2013.


Shirt: Zara (old. Similar here).  Tank: Gap (similar here).  Floral print skinnies: Madewell.  Bracelets and belt: J. Crew.  Purse: Rebecca Minkoff.  Sandals: Zara (old. Similar here).


Sandy and I took turns taking outfit pics for each other.  I was super embarrassed to be shooting in such a public place but with Sandy's encouragement and speedy photography skills, we were able to capture a few decent shots.  This lady saw Sandy taking pictures of me and wanted to be part of the shoot.  I guess that's part of taking pictures in a public venue!


I swapped the top and shoes and added a leather jacket for dinner at night.  I have a big list of restaurants to hit before I leave LA.  I can officially check off Michael Voltaggio's Ink off my list...drool...


Jacket and shirt: Zara (both old).  Shoes: Alaia (from our Decades shoe sale haul)

Thursday, March 14, 2013

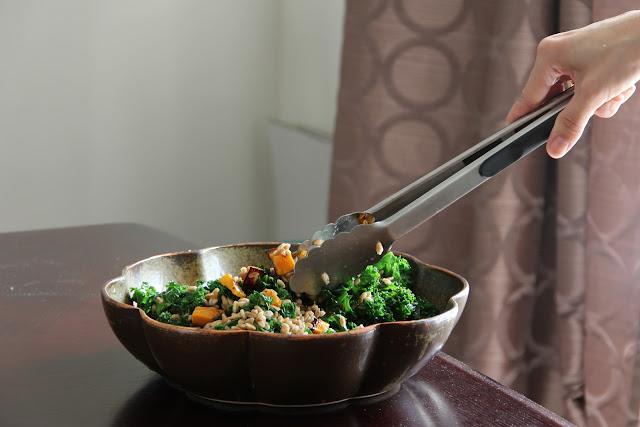
Farro Salad with Butternut Squash, Kale, and Feta


The very first word out of both our mouths after taking a bite of this salad was "MMMMM".  Okay, "MMMMM" is not really a word but the sweet roasted butternut squash paired with the fresh leafy kale, slightly nutty farro and the crumbled feta is just too good to describe with words.  This salad is the perfect meal to transition from winter to spring.  

We had a jam packed day planned and wanted a quick and healthy lunch, so we turned to Trader Joe's for some help.  The precut butternut squash and the 10 minute farro were the perfect shortcuts to reduce the preparation time from a long hour to a speedy 20 minutes.


Farro Salad with Butternut Squash, Kale and Feta 

Ingredients
1 butternut squash (we used a 2 pound bag of peeled & cubed squash from Trader Joe's)
1 bunch kale, washed and stems removed
2 cups farro (again, we used a 8.8 oz bag of Trader Joe's 10-minute farro)
1/2 cup crumbled feta
1/3 cup white wine vinegar
1/3 cup extra virgin olive oil plus extra for drizzling
1/2 tsp sea salt plus extra salt for seasoning
Freshly ground black pepper

Directions
Preheat oven to 375 F. Dice butternut squash into 1/2 inch cubes and spread out on aluminum foil lined baking sheet. Drizzle with olive oil and season lightly with sea salt and freshly ground pepper. Roast in oven for 20-25 minutes until tender and the edges are caramelized.

Meanwhile, bring a pot of water to boil. Add the kale until just softened, drain, and immediately rinse with cold water. Cook farro according to package instructions.

Whisk the 1/2 teaspoon of sea salt, white wine vinegar and olive oil in a small bowl.  Season with additional salt and pepper to taste. Toss the roasted butternut squash, flash-boiled kale, cooked farro, and vinaigrette dressing. Mix in the crumbled feta.

Can be enjoyed warm, at room temperature, or chilled.  If refrigerating, store in airtight container. 


Tuesday, March 12, 2013

Work Outfit Series: Honeyed Peplum Skirt


When dressing for work, one of my biggest goals is to make sure I'm comfortable.  When I'm running around our huge hospital, you can find me wearing flats on most days (we'll be posting about our favorite ones soon!).  However, when I'm in the clinic seeing patients, I can afford to wear a heel since I'm sitting most of the time.  By no means does this mean I'm wearing a stiletto pump, but something a little more substantial like a wedge or a chunky heel. I also usually like to throw in a bright color.  This is one of my go-to skirts as it's fun to see the yellow peeking out beneath my white coat. 


Here's how I wear this same outfit when the weather is a little warmer: sans tights, with a nude wedge heel.  No matter the season, you'll always find me with my trusty iPhone in hand since I never carry a purse to work.

Shirt dress worn as shirt: H&M.  Honeyed Peplum Skirt: Leifsdottir.   
Heather gray tights: Hue.  Purple suede booties: Chie Mihara (similar here).  
Nude wedges: Kate Spade (similer here).


Blogging tips